Wednesday, December 4, 2013

The MSI GE60 - Do Gaming Notebooks hold their promises?

Gaming Notebooks are a much-discussed subject these days, considering how many big manufacturers there are selling them; MSI is just one of a growing population of notebook companies.

This particular notebook, the MSI GE60, has an Intel Core I7 - 3630QM, an Nvidia GeForce GTX 660M with 2 Gigabytes of VRAM, 8 Gigabytes of RAM and a 15.6" Monitor, having a Resolution of 1920x1080. It has two USB 2.0 and two USB 3.0 slots.
When looking at it you can see the quality of the case is robust and when starting to work with it you can feel the quality of the components.
Copyright © 2013 Micro-Star Int'l Co., Ltd. All rights reserved


The Keyboard is manufactured by SteelSeries and feels comfortable even after typing for a long time. A negative aspect about it is the Enter-button, though. It's slim and long instead the usual big and high one, but after some time of getting used to it, that is not a problem either.


Above the keyboard, there are 6 buttons with different functions; turning it off, activating Turbo-Mode for gaming, turning the fan to maximum performance, deactivating the wireless functions, turning off the screen and opening the CD-Drive. They are implemented into the design nicely and can come in pretty handy.


Now, the speakers are not the best, lacking the bass and not having the highest maximum-volume, but their sound quality is great and they are definitely enough for gaming and listening to music, but using headphones is still highly recommended.

The machine's monitor has a good color-depth and can get very bright if needed and the high resolution makes sure that games and movies look on it.

Being a year old, the hardware in this machine is not the newest anymore, but it can still run most games at a decent frame rate if the Graphics settings are set up right, depending on the game of course.


Small issues with the keyboard, the speakers not being the best and the CD-Drive being manufactured poorly make up the only problems with this otherwise decent notebook. It is perfectly suited for working and moderately good at playing new games at an acceptable frame rate. For the price of 1089€ or your regional equivalent, this machine has a high performance-peak and there is very few negative aspects about it that might bother the user.

Here's a link to the manufacturer's website.

Sunday, November 17, 2013

Busy days, busy nights

Good evening, good morning or good whatever time it is where you live!
It's been quite some time since my last post again. More than two weeks this time. Well, I guess it will keep being like that for the next few weeks or months, until I figure everything out and get a regular practice schedule.
The last two weeks have been really busy for me, mostly being at the university at daytime or using my free time to get things running smoothly in my life. The nights weren't amazing neither, having to do personal things until 3 to 4 A.M pretty much everyday. 
Well, with that being said, let's get to business!
A small rundown here: At university, we were put into groups to make our first game. We were assigned the game Bomberman. The assignment was to recreate a classic game in 3D. We had the idea of three maps: Space, Four Seasons and Candyland. Me and a friend of mine went for the Candyland map.


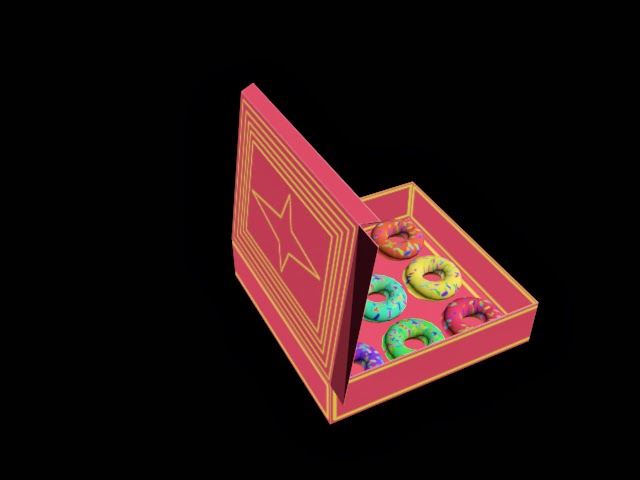
Now, as you all (probably) know, Bomberman has indestructible objects and destructible ones. In addition to that, we thought about putting some neat-looking assets into the game, which I made a Donut Box for. The Chocolate is the destructible object. It has 42 Polygons and has only one material on it. I used material ID's for the two different colours.
The Donut Box was a little more complicated. I had to UV-Unwrap and texture the whole thing by hand, which was really fun at the start, but just a hassle when I was already working on it for around two hours. It has 1212 Polygons and my work time on it was around 4 hours, with short breaks here and there. 
This doesn't look like it's too much, but it was all I could do in these last two weeks. I hope I can get to practice 3Ds Max more, but I can't promise anything right now.
I'm not gonna say anything about when the next post is going to come, but there's one thing: We got an assignment at university to write 3 Blog-Posts about different things. That's what I'm gonna say here, just wait and be (hopefully positively) surprised when they come!
Guess that's it from me for now! I wish you all a great day or night, whenever you're reading this.
See y'all later.

Art is not what you see, but what you make others see. - Edgar Degas

Wednesday, October 30, 2013

Back on track... again

A friendly hello to everyone reading my blog!
So I've been back from Amsterdam for quite a while now. I have to say those three days were amazing. The convention wasn't what I expected but it was an interesting experience for sure. I'm looking forward to next year's convention and I really hope that there will be more for us game artists to see than this time. So, let's get straight to business here.
I didn't quite get the chance to model anything so far. Until now, that is. We had our first shot at texturing today in class. That includes, of course, UV Mapping and applying textures. Today, I will show you the finished model and the UV Template I created to texture an assignment we got a week ago. The assignment was to model a simple street sign. Since I wanted to do something more creative I came up with the idea to do something more medieval, so to say. Instead of trying to explain it, I guess I'll just show you:


My work time on this model was around 3 hours with texturing and UV mapping. It was quite fun to do this, even though I had some problems like texturing the top part of the base, which still doesn't look anywhere acceptable for me but since I didn't know how to fix it I decided to just roll with it. Doing the UV layout was pretty fun too, considering I only just learned it today, like twelve hours ago. I had to remember quite a lot of stuff and made MANY mistakes. At the end I managed to do it though. 

Guess that's it from me for now again. I have to thank everyone who reads this blog so actively again. Pretty impressive to me, after just roughly one and a half month of posting in here. 
Alright, so I'll see you guys next time! 
Take care, y'all.

Art is a lie that makes us realize truth.” Pablo Picasso 

Sunday, October 20, 2013

More Practice, more info on future Posts

Hello again, everyone
First of all, I'd like to thank everyone who actively follows this blog after just one month of it being created. Getting all those E-Mails asking me where I've been and when I'm going to post something again sure is very motivating. 
Now, that being said, I won't promise anything along the lines of posting once a week again, but I'll try to keep it up most of the time since we now started to get assignments at University. Assignments about making 3D-Assets, that is. I think I'll have an easier time keeping regular posts up that way. 
Let's go straight to my practice then. This is what I modeled mostly out of my imagination with some references here and there:

Obviously, this is a fire hydrant. It has around 58,7 thousand polygons, thus being the highest-polycount-model I've done so far. And it's been a blast trying out different techniques.
The hardest part was definitely extruding those cylinders out of the base cylinder without using a boolean since those easily mess everything up. That part took me around an hour. After that it was just pretty much doing the same things I did with my earlier models, just being more careful this time so I don't mess up the flow of the edges around the mesh. 
Total work time on this model: 5,5 hours with breaks here and there.
I could have done it way faster, but I paid extra attention to the top and the bottom parts. Additionally, it's pretty late here in Germany right now so I wasn't at the peak of my concentration at all.
I'm pretty happy with my model as it stands, there's probably a lot of room for improvements and if anyone has any critique, feel free to comment and/or E-Mail me about it.

On another note, I'll be in Amsterdam at a convention this coming week so the next post might be in a week and a half again. Just to inform everyone about that.

Alright, so that's this "week"'s post, I hope you enjoyed reading it. I sure enjoyed modeling the hydrant and writing this post, that's for certain!
That's it from me, then. See y'all later, take care!

The critic has to educate the public; the artist has to educate the critic. - Oscar Wilde

Tuesday, October 15, 2013

Lack of Posts lately

Hello there, everyone!
I feel like I had to do this post just because I haven't been able to post anything lately. That's because I've been moving all my stuff to another flat, which took quite some time. Now that that's done, I'll be able to post more regularly in the coming weeks... I hope.
The reason why I even do this post after only three really productive ones is because I, for some reason, have already been getting E-Mails about my whereabouts and why I wasn't posting anything in the past few days. To be honest, I didn't think I'd get some active followers in the first month of actually creating this blog.  No lie, there's people that follow this blog actively. I, of course, am very glad that some people are interested in what I do, making this even more fun for me to post regularly.
Well, that was just a heads-up on my situation for those few followers I have.
Thanks for already following this blog at these early stages!
Have a great day and I'll see you guys later (I hope).

Saturday, October 5, 2013

Quite a busy week

Good day everyone!
This week I only had the time to practice on one model, sadly.
I modeled a ventilator roughly based on the one I had standing around here. It took me around four hours, quite the improvement compared to the six hours I needed for a shabby lamp.
On another note, we started with our Photoshop class at Uni so you can expect some 2D-Stuff coming soon. Not necessarily drawings or paintings, more like practice in all those tools. I had some experience in Photoshop before, fortunately, so those won't look too bad... I hope.
So here's the model I made:


Making the actual fans was probably the most fun figuring out. Took me 45 minutes, just for that part. I ended up using splines, a shell modifier and the soft selection tools to bend them like that. The rest was just primitives and some more soft selection here and there. Pretty standart stuff I think.
Work time: ~4 Hours, with only one break of an hour or so.

Well, that's it from me again! This post was kind of short, but I couldn't really practice more lately. That's gonna come with time though. So for now..
'Til next time, everyone!
Seeing flaws can lead to paralysis. We make the mistake of thinking anything short of perfection isn’t worthy. -Noah Bradley

Tuesday, October 1, 2013

First Steps

Some first practice Models I did
A friendly hello to everyone who follows this blog. I guess it's been some time. I'll try to update this more frequently once I start modeling on a daily basis, so by any means, the slow start does not mean that I will only post once every two weeks. 
Well let's get straight to business, I'd say. These are the three very first models I did on my own in 3ds Max. Remember that I'm starting off, so these might look kind of... bad for quite some time. Still going to post them here, though, to document my progress, as said earlier in the other post.


This fighter jet was made for a task that I downloaded from my university's student portal. The task was to model a Fighter Jet with no more than 200 Polygons. As seen in the second picture, I succeeded in that. Took me quite some time to get used to all the tools though, believe me. I made this maybe a week ago, but didn't want to post just one model, so I waited until I made more.
Work time on this jet: exactly 1 hour. Though I did this around 5 times, so you can multiply that hour by five.


So this is... an hourglass, obviously. I modeled this roughly after an hourglass I had lying around here while I was looking for something to model. The glass wasn't too hard to make. I just made a cylinder, put a FFD modifier on it and played around with the settings. The stuff around the glass was pretty easy too. Just some cube and cylinder primitives.
Work time for this hourglass: roughly 3 hours with breaks here and there.


And last but not least by any stretch of the imagination is this table lamp I modeled after the lamp I use on my table. For this, I did not care at all about Polygon counts, as you can easily see. It has 5700 polygons exactly and none of those is invalid (5 or more sides) because I fixed those after I was done with modeling it. This was a real pain to make after quite some time because I kind of used the wrong tools at the wrong places. Work time on this: 6 hours. Yes. You read it right. 6 hours for a table lamp.


Well, that's it for now. Not a whole lot more to say here, only that modeling is extremely fun even at my early stages, not knowing which tool does what and such. I'll do another post once I've done some more stuff that might even look better. Might be tomorrow or in 3-5 days. Not another week though, I can tell you that for certain. 
'Til next time!
In art, the hand can never execute anything higher than the heart can imagine. - Ralph Waldo